After I started working on my new platformer, I made some tweaks to it to try to separate it from the game that served as the original inspiration. The easiest change, that I thought of, was to make my game endless. Another idea was to have some sort of mechanic that would make my game more difficult the further you went along.
Keeping in mind that this game is about the player falling further and further down a hole in the ground, I thought that it would make sense that the visibility of the player would get progressively more restrictive the further down the player fell.
After some quick googling I found a simple little tutorial done by Zach Bell Games that looked perfect (Also if you don’t follow his work, you really should). The Zach Bell Games tutorial requires that you know a thing or two about surfaces in Gamemaker Studio 2, and even if you don’t it’s pretty easy to follow along. The only issue with the Zach Bell Games tutorial is that this is designed for a platformer with a fixed room size, which you can tell from this little section of code.
// Create a surface the size of the current room

// You could also create a surface the size of the current view, but I won't get into that

surf = surface_create(room_width, room_height);
They are making a surface the size of the entire room to create the darkness effect. This method doesn’t work with my endless platformer, because if a surface gets too big it will cause my game to crash. The tutorial, at Zach Bell Games, didn’t get into making a lighting system that only covers the view (as seen in that code block), so I needed to do it myself.
To start with this process I made a create event that is very similar to the one in the Zach Bell Games tutorial. The only major difference is that instead of making a surface that is the size of the room, it will only be the size of the view / camera. You are able to find the size of your view by going into the room editor and looking at the section “Viewport and Cameras”. My viewport is only 352 by 512 so I created a surface that size inside of my create event.
// Create Event

// Create the surface for lighting

surface = surface_create(352, 512);
// Set the surface target to the new surface instead of the application surface

surface_set_target(surface);
// Clear the surface

draw_clear_alpha(c_black, 0);
// Reset target surface back to the application surface

surface_reset_target();
Now that this surface is exactly the size of the view I can fill the surface with a translucent black layer black inside of the step event to give the effect of darkness. You should also keep in mind that surfaces are volatile and can be deleted randomly, so always check to make sure the surface still exists.
// Step Event
// Check that surface exists

if (surface_exists(surface))

{

// Switch surface to draw to

surface_set_target(surface);
// Select the colour to draw

draw_set_color(c_black);
// Set the alpha value to draw at
draw_set_alpha(0.8);
// Fill View with black
draw_rectangle(0,0, 352, 512, 0);
// Reset the alpha
draw_set_alpha(1);
// Reset the target

surface_reset_target();

}

else

{

// Run the create again if the surface isn't detected

surface = surface_create(352, 512);

surface_set_target(surface);

draw_clear_alpha(c_black, 0);

surface_reset_target();

}
Just filling the surface with black, in the step event ,doesn’t draw anything to the screen. To be able to draw the surface to the screen you need to run some code in the “draw end” event; however, this is where things get a little bit tricky. We now need the surface to follow the view because it isn’t going to fill the whole room. The tutorial by Zach Bell Games drew the surface at the position 0,0 and that isn’t going to work for this system because the surface would stay at the top left of the play area.
The first thing that you would probably think of is to draw the surface at the player’s current position. This might make sense because more than likely your view is set to follow the player. So if I go to the “draw end” event and run the code draw_surface(surface, obj_player.x, obj_player.y); this is what our view will look like.

The draw_surface command starts to draw the surface at the top left hand corner, when we provide it the x and y position of the player Gamemaker will start drawing the surface at the player object’s pivot point. Clearly, that will not do, I need to draw the surface starting at the top left of the view. Thankfully Gamemaker studio provides a method to be able to get top left X and Y position of whatever view you want. By making 2 local variables for the x and y position you can run the commands camera_get_view_x(camera) and camera_get_view_y(camera) to get the X and Y coordinates of the top left corner of the view (This command is different if you are using Gamemaker Studio 1.4). We can update our draw end event and see what we get.
// Draw End Event

if (surface_exists(surface))

{

// Get the X position of the view

var _x = camera_get_view_x(camera);
// Get the Y position of the view

var _y = camera_get_view_y(camera);
// Check what view we are on and draw the surface at _x and _y

if (view_current == 0)

draw_surface(surface, _x, _y);

}

else

{

// Run the create again if the surface isn't detected

surface = surface_create(352, 512);

surface_set_target(surface);

draw_clear_alpha(c_black, 0);

surface_reset_target();

}

}
Now I are getting somewhere. The black surface is now being drawn at the top left hand side of the camera, and it will always stay in front of the view no matter where the player moves because we are getting its position each time the draw_end event is run.
Now I just need to cut out the little circle of light around the player. I can go back to the step event and add in a couple more functions to take care of this. I need to set the blend mode to subtract, set the colour to white, and then I am ready to draw our circle (but don’t forget to set the blend mode back to normal after you draw the circle around the player). So now inside of the step event I check if the player object exists, and run the draw_circle function and feed it the x and y position of the player and see what happens.
// Draw Circle in Step Event
// Set blend mode to subtract

gpu_set_blendmode(bm_subtract);
// Set colour to draw

draw_set_color(c_white);
// Check if Player object exists

if (instance_exists(obj_player))

{

with (obj_player)

{

// Draw the light circle

draw_circle(x + random_range(-1, 1), y + random_range(-1, 1), 50 + random_range(-1, 1), false);

}

}

gpu_set_blendmode(bm_normal);

draw_set_alpha(1);

surface_reset_target();

What is going on here? Well, when we draw the circle we are providing it the X and Y position of the player in the room, and because the surface is following the view our little light circle will run away from the player. What I need to do is draw the circle at the X and Y position of the player inside of the view. To fix this I wrote a simple little script to be able to figure out the X and Y position of any object inside of the view.
// x_in_view(x)
// X position of Object

var _x = argument0;
// Check X position of object in view

_x = _x - camera_get_view_x(global.camera1);
// Return position of object in view

return _x;
That code block was just for the X position, I created a separate script for the Y only I changed the function to camera_get_view_y. With these two scripts I can figure out the X and Y position of the player object inside of the view and I should be able to cut out a circle of light around just the player. This is what the finished step event looks like.
// Finished Step Event

if (surface_exists(surface))

{

// Switch surface to draw to

surface_set_target(surface);
// Select the colour to draw

draw_set_color(c_black);
// Set the alpha value to draw at

draw_set_alpha(0.8);
// Fill View with black
draw_rectangle(0,0, 352, 512, 0);
// Set blend mode to subtract
gpu_set_blendmode(bm_subtract);
// Select the colour to draw
draw_set_color(c_white);
// Check if player object exists
if (instance_exists(obj_player))
{
with (obj_player)
{
// Get X position of player in view
var _x = x_in_view(x);
// Get Y position of player in view
var _y = y_in_view(y);
// Draw the light circle
draw_circle(_x + random_range(-1, 1), _y + random_range(-1, 1), 50 + random_range(-1, 1), false);
}
}
// reset blend mode
gpu_set_blendmode(bm_normal);
// Reset alpha
draw_set_alpha(1);
// Reset target

surface_reset_target();

}

else

{

// Run the create again if the surface isn't detected

surface = surface_create(352, 512);

surface_set_target(surface);

draw_clear_alpha(c_black, 0);

surface_reset_target();

}

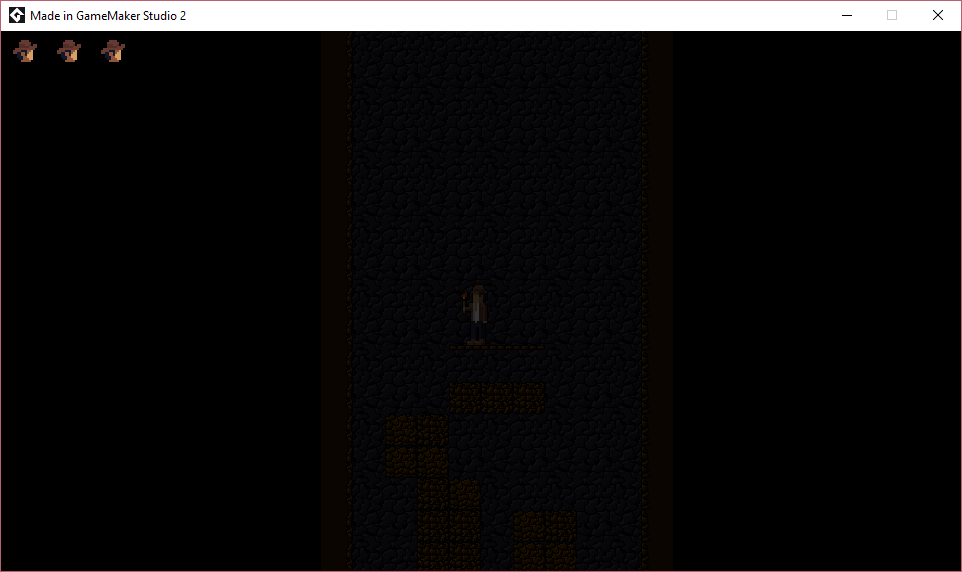
Now that is looking a lot better. The scripts x_in_view and y_in_view are also able to return the view position of any other object I want. So because my game has enemies that also generate light I just copied the code from the player and provided the x and y positions of my enemies.

There it is, a lighting system that only covers the view and will work in an endless runner.
Until Next Time
– Steven


